Springy Feeling
MATERIALS NEEDED:
-
Patience :-)
-
Your PSP (any version will do. I'm using PSP 9)
-
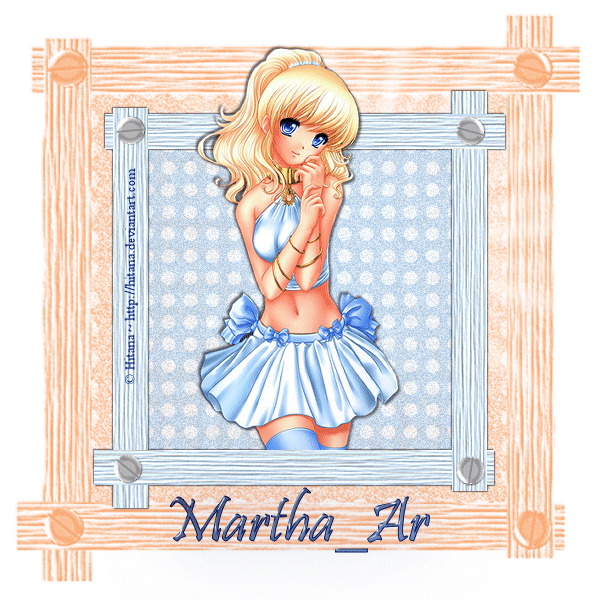
A tube of your choice. I'm using a beauty by ©Hitana (http://hitana.deviantart.com/)
-
Filter: Eye Candy 4000 < Chrome & Glass
-
Filter: VM Naural < Starmaker, Glass & Shadowlab
-
More patience
-
My zip file containing the following: Grain long deep texture (I found it in my PSP9 textures folder, so I think it comes with it); Martha_Ar.msk (made by me)
Don't forget to save the image frequently, please.
1. Open a new image, 400 x 400, transparent.
Let's start by making the corrugated paper.
2. Open your tube of choice and pick two colours, a dark and a light one, for your colour palette. Look for the foreground-background gradient, linear style, angle 90º, repetitions 90 (foreground/stroke tab). This last figure is approximately. It depends on how big or small you like your corrugated paper.

Now we have a nice corrugated paper to use. Save it as psp file (if you want to colorize it later) or export as jpg file. Don't close the image. We're going to work on it now.
I realized that the lines were too wide, so undid the gradient and gave it 180 repetitions. For the corrugated paper, 90 repetitions are OK, but for what we're going to make now, they're too wide. So, maybe you'd like to change the number of repetitions like I did.
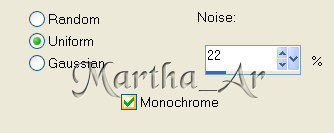
3. Activate your Selection tool. Choose Custom Selection and use the following settings:

4. Now activate your Cropping tool and choose the Current Selection option. Double click inside the selected part. That will crop the thin portion we need.

5. Open a new image 600 x 600, transparent and floodfill it with white.
6. Activate your cropped image, copy and paste it on the new image. Move it to your left. Duplicate this layer and go to Image < Mirror.
7. Go to Effects < Texture Effects < Texture. Use this setting for both borders.

8. Duplicate one of the layers twice and go to Image < Rotate < Free Rotate. Choose 90º to the right or left for both copies.
9. Now we are going to arrange the four borders to make our frame. I moved my layers so they have an overlapping look. I also used the Selection tool (rectangle shape) and trace a rectangle in the lower part of my lower horizontal border. I promoted the seletion to raster layer and moved it to the top in the layer palette. Here's the screenshot:

10. Hide the background layer and merge the four border layers.
11. Open a new image, 100 x 100. In your Shape box, choose Elipse, Create as Vector and Antialias, both checked. Use #808080 as your foreground colour and #c0c0c0 as your background colour. Now look for your Foreground-background gradient in the fill tab. Close the stroke tab, so the circle does not have an outline. Create a perfect circle, use the Shift to help you.

12. Go to Objects < Align < Center in Canvas. Convert the vector layer to raster layer.
13. Now, we'll apply the Chrome effect. Effects < Plugins < Eye Candy 4000 < Chrome. Look for the Shiny Penny bevel and use the following settings:

14. Adjust < Hue and Saturation < Colorize. Use 0 in both, H and S.
15. Activate your Selection tool. Open a new layer and trace a very thin rectangle in the middle of your circle.

16. Effects < 3D Effects < Cutout. V and H: 2; Opacity: 100; Blur: 8; Shadow Colour: Black. Lower the opacity to about 58%. Save as psp image, without merging layers. You now have a screw to use in future tags.
17. Merge visible layers, copy and paste as new layer on your frame canvas. We'll need to resize it. I resized mine to 75% four times. Now, Adjust < Sharpness < Unsharp Mask.

18. Duplicate the screw layer, Image < Mirror. Duplicate this second screw, and Image < Flip. Duplicate this last screw, and Image < Mirror. Don't forget to arrange the position of the screws, so they look well positioned in your frame.
19. Merge the screw layers and apply a light shadow. I used: V: 0; H: 1; Opacity: 55%; Blur: 1; Colour: Black. Before merging the layers, I rotated each screw a bit, so they didn't have a too tidy look :-)
20. Now we are going to make a background for our frame. Click the Magic Wand inside your frame. Go to Selections < Modify < Expand by 7. Open a new layer, above the frame layer and below the screws layer. Floodfill it with a colour of choice.
21. Go to Effects < Artistic Effects < Halftone. Use the settings below:

22. Add some noise (settings below) and lower the opacity of this layer by 80%.
23. Copy and paste your tube as new layer on your working canvas. I like giving my tubes the appearence that they are going out of the frame, so using the Selection tool, I selected the top part of the tube (the one hidden by the frame and the part that followed it), and promoted the selection to layer. Then, I cleaned the selected area in the original tube and moved the layer with the selection to above the layer with the frame. That's the usual way I make this.
24. Let's add our tube a drop of shadow, using the Shadow on new layer option. I used this setting: V and H: 2; Opacity: 55%; Blur: 3; Colour: Black. And repeated changing V and H to negative numbers (-2). You will have to use your Lasso or Selection tool to erase part of the shadow that's appearing between the zone where the to sides of your tube join. This is if you followed me :-) with tube cropping. Look at mine:

25. Now, we'll add another drop of shadow to our frame. I used V and H: 1; Opacity: 55; Blur: 2; Colour: Black. And repeated using negative numbers for V and H. And again I ad to clean the zone where the two parts of my tube joined :-)
26. Add a new layer above the white layer that is at the bottom of your layer palette. Floodfill with a colour from your tube.
27. Layers < Load/Save Mask < Load Mask from Disk. Look for Martha_Ar1.msk.

28. Merge group and apply some shadow: V and H: -1; Opacity: 55%; Blur: 3; Shadow Colour: choose a colour a bit darker than the one you used for the layer where you applied the mask. Merge the mask and the shadow layers and make two copies.
29. Close all the layers, except for the three mask layers. We are going to apply the filter VM Natural < Starmaker, with the following settings (starting from the original layer and moving up in the layer palette):


30. Now choose a nice font to add your name. I always tick Vector when writing, that way I can center my text in the canvas. If you used Create as Vector, convert to Raster layer.
31. Filter Eye Candy 4000 < Glass.

32. Let's use our Eye Candy 4000 again. Choose Shadowlab, this time. Use these settings:

33. Add the copyright info. And let's start copying merging and pasting in the AS.
34. Close the second and third copy where you applied the Starmaker filter. Copy merged and paste as new animation. Back to PSP, close the first layer and uncover the second one. Copy meged again and paste in the AS after the current frame. Last time to PSP, close the second layer and discover the third one. Copy merged again and paste in the AS after the second frame.
35. Save as gif. And we're done!!!
I do hope you have enjoyed this tut. It's the first one of a saga I plan to write, using techniques to make different scrap elements and the use of different PSP effects and filters. We'll discover them together :-)))
If you decide to have a try at this tut, I would love to see your result. Please, send it together with any comment or suggestion you would like to make, to the addie below. Press my name to get it.
April, 2008
Please, do not claim my work as yours, copy or grab any of the material here (written or graphic) in any way or place. All my tuts were registered with TWI before I showed them in this site.

