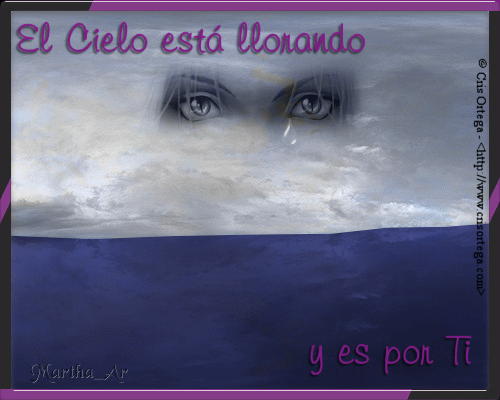
El Cielo está Llorando...
y es por Ti
I wanted to make a tag to express my feelings when a loved one leaves this Earth of ours.
I chose a name in Spanish (my mother tongue) for this tut. The whole name is: 'El Cielo está llorando... y es por Ti'. In English, it would be something like: 'The Sky is crying... and it's for You'.
So here it is, my newborn, a 'goodbye' tag for my friend and half brother, 'Gringo'.
Hope you like it.
MATERIALS:
Open the zip file and save each element into the proper folder.
-
'Eyes_CrisOrtega' brush (made by me misting a beautiful image belonging to ©Cris Ortega - http://www.crisortega.com)
-
Martha_Ar-Template ECEL. I made it using different effects, brushes and filters.
-
Tear Drop tube.
-
Install the filter Sqirlz Water Reflections in your C drive. It's a stand alone filter (like 20/20) so it runs by itself.
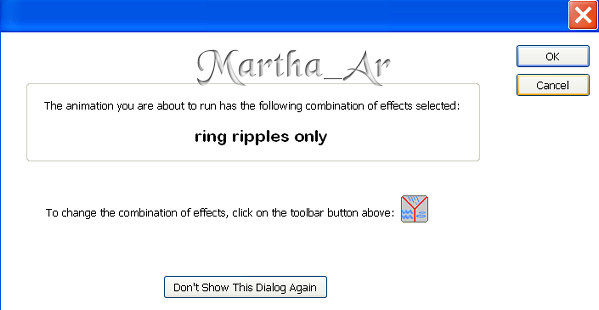
1. Open the Martha_Ar-Template ECEL in the program (filter) Sqirlz Water Reflections: File < Open, and look for the jpg file.
2. Press the Rain/Snow and Ripple Combination button and a tab appears (see below). Choose the Ring Ripples Only option.


Soy un párrafo. Haz clic aquí para agregar tu propio texto y edítame. Es muy sencillo.
3. Activate the button I've highlighted with the purple rectangle. It works like the Freehand Selection tool in PSP.a

4. Click on the image and start delineating the water outline with the tool.a

Futura Light es una fuente inspirada en elementos del diseño Bauhaus. Destaca tus palabras y es ideal para títulos, banners, logos y más.
Futura Light es una fuente inspirada en elementos del diseño Bauhaus. Destaca tus palabras y es ideal para títulos, banners, logos y más.
Avenir Light es una fuente limpia y elegante, apreciada por los diseñadores. Es agradable a la vista e ideal para títulos, párrafos y más.
5. Press on the button 'Customize Ring Ripples'. A tab opens.


6. We are going to work with the buttons on the upper left of the window (our right).

7. Press the 'Water Color/Darkness' button and choose a shade a bit darker than the water colour. Press OK and the tab closes.

8. Click on 'Position Single Ripple' and another tab opens. Click on the 'Position the Ripple' button and then right-click your mouse on the place where you want the ripple to appear. Close both tabs.

9. You can preview the animation by clicking on the yellow arrow (Run Animaton).

A notice opens. Click OK and you will be able to see the ani.
10. Now, click on Save animation as image files.

11. Another tab opens. Click OK again.

12. Now save your animation. A series of tabs are going to open (see the screenshots):
You may save the files in any of these: as jpg (with the highest quality) or as png.


The animation starts saving as separate files. This process may take some time, so be patient.

When the saving process is done, a final tab appears. Just click Aceptar and close the programme.

13. Open your AS and we are going to make our ani. Go to File < Animation Wizard. And follow the screenshots again.

14. We have to follow these little windows, though most of them won't affect our ani, (the ones that matter we can change afterwards) but they are part of the process.


15. This is the one we need. Click on Add Image and look for the folder where you have saved the files.

16. Start by clicking on the one with the number '0' (zero) and click Abrir / Open.

17. The file appears in the window (see below). Click Add Image and choose number 1 (one). Repeat the same process until you have included all the files (twenty) in the ani.

18. When you have added the last file, click on Siguiente / Following

And then choose Finalizar / Finish.

19. Go to Edit < Select all. Right-click on any frame of the animation and choose Export Frames to PSP. Right-click on any frame of the ani, and choose Break the link with the exported frames.
20. Close all the layers except the one named 'Frame1'. Open a new layer on top of the last 'Frame' layer (twenty) and name it 'Eyes'. Activate your Brush tool and look for my 'Eyes_CrisOrtega' brush. Use colour Black as you foreground colour. Apply it once and turn the blend mode into 'Luminance (Legacy)'.

21. Open the 'tear drop' tube, and export it as picture tube. Now, open a new layer on top of the layer palette. Name it 'Tear1'. Look for the Tear Drop tube and apply it. I used scale 25 and applied it below the eye on my right. I also lowered the opacity of the tear layer to 72. Link the Eye and the Tear1 layers.
Use the Guides to place the eyes and the tear just above the centre of the ripple. See the screenshot below:

22. Duplicate the tear layer and resize it by 85% twice. Move it downwards, and place it just where the ripple starts.

23. On the Frame20 layer (the one at the top), Selections < Select All. Selections < Float. Selections < Defloat. Selections < Modify < Contract 11 pixels. Selections < Invert. Selections < Promote Selection to Layer.
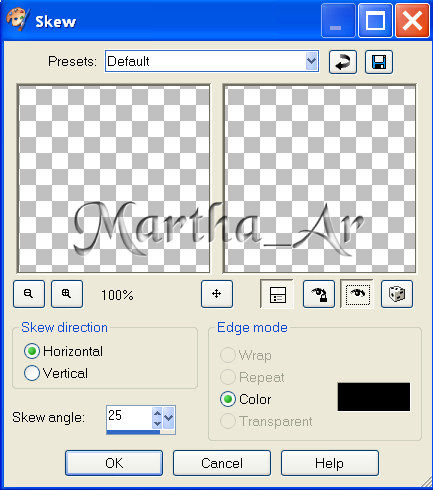
24. On the promoted layer, Edit < Clean. Floodfill with color #821b87 (the colour for mourning). Effects < Geometric Effects < Skew.
25. Optional: Effects < Texture Effects < Blinds.

Repeat, but this time tick Horizontal. Selections < Select None.
I applied filter Eye Candy5: Impact, Glass effect. to mine and skipped the Texture effect.
26. Add the copyright. In this case, unless you have used another brush or tube for the eyes, we are going to use: © Cris Ortega - http://www.crisortega.com. Add your text and your watermark. I applied a soft drop of shadow to my text to give it a dramatic effect (Font: Kayleigh, size: 26).
Now, let's animate our tag. Have a look at my layer palette, so it will be easier for me to guide you:

27. Close all the Frame layers except the uppermost (Frame 20) and the copy of the tear. Copy merged and paste into your AS. Back into PSP.
28. Uncover the copy of the tear and cover the tear layer, and cover the Frame20 layer and uncover the Frame1 layer. Copy merged and paste into your AS. Back into PSP.
29. Cover the copy of the tear layer, and cover the Frame1 layer and uncover the Frame2 layer. Copy merged and paste into your AS. Back into PSP.
30. You have to repeat this process of covering and uncovering the frame layers, copying merged and pasting into the AS till you get to frame19 and have 20 (twenty) frames in your animation.
31. Give a Display Time of 22 to all frames except frame1, to this give 100. And were finished!
I do hope you've enjoyed this tut. It has a very special meaning, as I wrote at the beginning.
Aa always, if you decide to have a try at it, don't hesitate: I'd love to see your results and upload them to my ***Tags Showcase***. Just use the link in my name.
Tutorial written in May, 2008
Please, do not claim my work as yours, copy or grab any of the material here (written or graphic) in any way or place. All my tuts were registered with TWI before I showed them in this site.

