We are going to make two tags: a static and an animated one :-)
Materials:
-
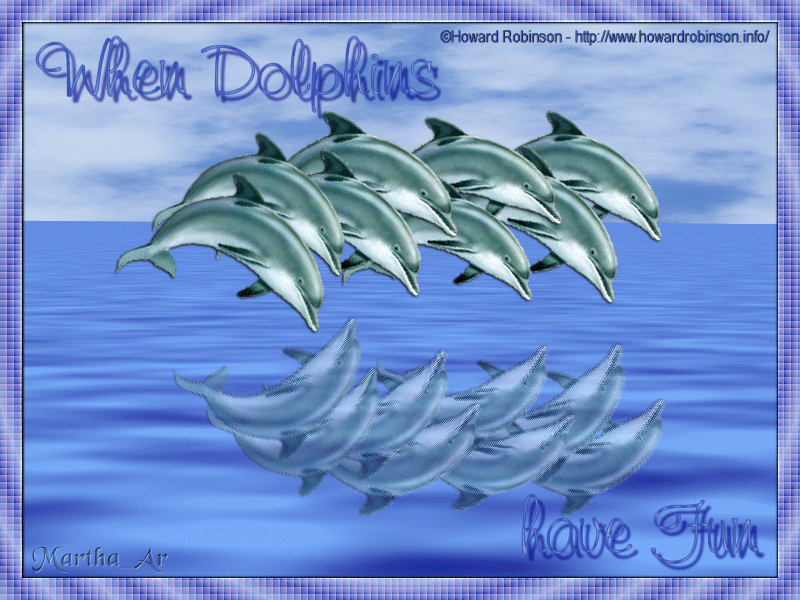
The attached dolphin tube (©Howard Robinson - http://www.howardrobinson.info/)
-
Filter Flaming Pear < Flood
-
Filter Mura's Meister < Cloud
If you want to make the static version, please read the following. I've used green for the parts you have to skip.
-
in step 8, just colour the canvas (don't make the copies);
-
skip step 10;
-
in step 11, you don't have any copies to hide;
-
in step 14, you can deselect;
-
skip step 15;
-
in step 17, just apply the Ripple effect on the copy;
-
your tag is finished to save as jpeg after step 20.
1. Open the dolphin tube, make a copy and close the original.
2. Open a new transparent image 800 x 600. Open a new layer and floodfill with white. We'll colour it later. I prefer to work on a white canvas to see what I'm doing.
3. Paste the dolphin as new layer. Resize by 85%. Image < Mirror. Move it to your right (not the screen's right). Use the Deform tool to turn it to your right. You can also use Image < Rotate < Free rotate with these settings
4. Adjust < Sharpness < Adjust Mask. Rename Dolphin1.
5. Repeat step 3, but this time resize it by 90%, and rotate it 33º to the right. Move it to your right, and place it as if it were half covering Dolphin1. Repeat step 4 and rename it Dolphin2.
6. We are going to repeat these steps some more times, so I will just give the resizing and the rotation values. You go on renaming the dolphins. I will embed the screenshot of the whole scene at the end. Don't forget to apply Unsharp Mask effect to each dolphin after you have finished the resizing and rotating.
Dolphin3: Resize by 85%; Rotation: 22º to the right.
Dolphin4: Resize by 80%; Rotation: 35º to the right.
Dolphin5: Resize by 90%; Rotation: 27º to the right.
Dolphin6: Resize by 87%; Rotation: 41º to the right.
Dolphin7: Resize by 82%; Rotation: 44º to the right.
Dolphin8: Resize by 89%; Rotation: 47º to the right.
7. Now, link all the 'dolphin' layers together, so you can move the whole school together.
8. Choose a light-blue shade to colour the white canvas. I used #77a7f5. Duplicate this layer twice and close the copy layers.
9. Plugins < Flaming Pear < Flood. I used the settings you see below. You can choose another colour where I used #0c0e85 and play a bit with the settings. Apply on the first light-blue coloured layer.
10. Move to the first copy of the coloured layer, unhide it and apply the filter again. Press the button you see below to change the movement of the water. Do the same on the second copy.
11. Now hide the two copies. On the original coloured layer, trace the 'sky' contour using the Freehand Selection tool.
12. Plugins < Mura's Meister < Cloud. Use the settings below.
13. Don't deselect! Choose another light-blue shade and copy (or remember) the Hue and Saturation values.
14. Go to Adjust < Hue and Saturation < Colorize. Copy the colours you obtained. Don't deselect!
15. Now move to the first copy and delete the selected part. Do the same with the second copy. You can deselect by now :-)
16. Time to merge our dolphins. I chose to add a subtle drop of shadow (V: 1: H: -1; Opacity: 100; Blur: 3; Colour: Black) before doing it. Once you merged the dolphin layers, duplicate the merged layer and go to Image < Flip. Lower the opacity of the copy to about 50% and resize the layer by 90%. Arrange both layers.
17. Now, we are going to make two copies of the merged dolphins layer. Go to Effects < Distortion Effects < Ripple. On the original layer, use H & V: 1,00; Amplitude and Wavelength: 1,00; Edge Mode: Transparent. On the first copy, change Amplitude and Wavelength to 1,50; and on the second one, change them to 2,00.
18. Add the copyright info: ©Howard Robinson - http://www.howardrobinson.info/ and your watermark or any text you'd like to add.
19. On the transparent layer, go to Selections < Select All. Selections < Modify < Contract 22. Selections < Invert. Selections < Promote Selection to Layer. On the promoted Selection layer, Layers < Arrange < Bring to Top. Floodfill with a solid colour, gradient or pattern. I made a gradient using two different shades of light-blue and used Sunburst Style with 22 repetitions.
20. Effects < Texture Effects < Blinds. Settings: Width: 7; Opacity: 33; Colour: #e2c0f2; Ony Horizontal ticked. Repeat the Blinds effect. This time don't tick Horizontal but Light from Left/Top. Add a drop of shadow: V: 1: H: -1; Opacity: 100; Blur: 3; Colour: Black. repeat changing V to -1 and H to 2. If you chose to make the static tag, you can merge layers and export as jpeg right now :-)
If you chose the animated version, here comes the funny side.
21. Open your AS. On PSP, hide the two copies of water and the two copies of the dolphins. Copy merged and paste into AS.
22. Back into PSP. Unhide the first copy of the water (don't hide the original one: the sky would be gone), hide the first upside down dolphins layer and unhide the second one. Copy merged and paste into AS after the frame you have there.
23. Last time into PSP. Hide the second upside down dolphins layer and unhide the third; and unhide the third opy of the water. Copy merged for the last time and paste into AS as last frame. Give all three frames a speed of 75.
I made a third tag. In fact, it's not a tag, but a misted tube :-)
I hide all the text layers, except the credits. I also hide the copies of the water and of the dolphins, copy merged and pasted as new image.
I then activated the Freehand Selection tool
and traced the contour of the dolphins.
Then I went to Selections < Modify < Expand 7; and again to Selections < Modify < Feather 22. Finally, Selections < Invert. And pressed the Supr (delete) button. And voila!!!Here it is:
If you have any doubts, please, feel free to contact me.
Results and comments are always welcomed.
June 09, 2008
Please, do not claim my work as yours, copy or grab any of the material here (written or graphic) in any way or place. All my tuts were registered with TWI before I put them in this site.